How to draw the head – from a beginners experience

Disclaimer: Just a heads up, I’m still a beginner artist and I do a lot of research to make sure the information I share is accurate. But since I’m not a professional yet, I might be slightly off on some things. Feel free to let me know in the comments if there’s anything I could improve!
Hey there, fellow art newbies! Have you ever tried to draw a head or face and it ended up with something that unintentionally looks more like an alien than a human? I definitely have! When I first started drawing a few months ago, drawing heads was, and still is a very hard topic. The human head and all its intricate features are almost like the soul of the person or character.
So in my effort to learn how to draw the head properly, I stumbled upon a lot of methods to draw the head. You may, or may not have come across the popular artist Andrew Loomis, and his method of drawing the human head – simply known as the Loomis method. The Loomis method is very popular, and it’s like training wheels for your pencils, helping you to construct heads quickly and efficiently. However…as we will dive in, there are pros and cons of the loomis method and so I will dive into other methods.
Imagine flipping through your sketchbook and having it full of heads in various views, with faces that look back at you, full of personality and life! When I finally managed to draw a head in ¾ that didnt resemble a squashed orange, I did an inner victory dance. It really is an amazing accomplishment and something you should be proud of.
So without any further ado, grab a pencil, eraser & paper and lets get into the intricate world of drawing heads!.
What is the Loomis Method?
So what exactly is the Loomis Method? The Loomis method-defined by andrew loomis- is a method of drawing the head that takes simplified elements from the actual human skull to help draw the head. The loomis method is very systematic, there are steps you have to go through. The Loomis method encourages artists to break down the head into simple shapes and lines, and not get bogged down in all the intricate details of the skull and the face.
The method has us start with simple shapes-such as a ball or ellipse- and then turning them into forms, and slowly adding details ontop of a basic structure. So whether you’re drawing a front, side, or 3/4 view, or tilted views, these simplified forms give you a reliable framework to work from. (Forms are 3D versions of shapes. So for example a sphere is a 3D version of a ball or circle)
The Loomis Method is also great for learning the various proportions of the facial features. So when i was first drawing a few months ago, I had no idea where the eyes went, or how wide or small to make the mouth etc. The Loomis method helps us with this.
Here are a few key reasons why mastering the Loomis method is essential:
- Consistency in Proportions: Using a structured approach ensures that heads look balanced and realistic, no matter what angle they’re viewed from.
- Understanding Perspective: The method helps you visualize how a head sits in 3D space, which is critical when drawing from unusual angles like a 3/4 view.
- Simplified Construction: It breaks down complex anatomy into basic shapes, making it less intimidating for beginners to start learning.
- Adaptability: Once you understand the method, you can modify it to fit different face types and styles, giving you creative freedom while maintaining structural accuracy.
Structure of the Skull:
The skull is very complex and complicated, I’ve only studied a little bit of it, but as a beginner its important to note that pretty much theres only two sections to it, the cranium and the jaw. This is a massive oversimplification, but as a beginner I think just focusing on these two rather than the skull as a whole and all its intricate details is more important. Below is an example:


Step-By-Step on how to draw the head:
Okay so when I start to draw the head, I like to keep it simple. I like to think of it as, my first version will have mistakes, but I can always revise or erase as I go. This is something that was a gamechanger for me, so while my head drawings arent perfect, they have improved alot because I dont worry about making the 1st, or 2nd attempt perfect. I get my bad drawings of the head out of my system, and warm up my arm and then I get into drawing heads as good as I can. BUT even then, placement of elements can be off, so I always keep my drawings light and flowy.
1. Draw the Cranium:
You can represent the cranium of the skull as a simple circle.
- (not recommended) If you are on a digital software, you can use a circle tool instead of drawing it freehand. But this is not recommended (atleast in my own opinion, you are free to use it) because as we will talk about, the sides of the cranium are flat and not fully circular. Also it’s just easier to freehand draw the circles, and if you ever draw traditionally you’ll need to learn how to draw it.
- (Recommended) So as i’ve mentioned, learn to draw the circle freehand. This is hard, no doubt. The easiest way to do is is to learn how to draw loose and flowy. Dont push hard on the paper or the tablet, draw very lightly. You can also pantomime the gesture of a circle.

- Below is some images of me drawing circles. These are very boring too do, so i recommend doing them when you have a free moment, just doodle them, and overtime you WILL improve at it. I believe in you.

2. Draw in the tilt of the head:
- This is something I believe most guides/people skip over. What is the actual tilt/direction of the head. Is the head looking forward, forward but slightly to to the left, to the right etc?
- I learnt this recently, and it’s super important, as this will help in knowing the perspective/alignment of elements of the human face.
- Below is some examples:

3. Draw in the side planes of the head:
- This section involves us slicing off a portion of the head. Because the cranium is flat on the sides. So this slice represents the side plane of the head. Depending on the viewpoint of the head this can change.
- Front View: Slice off both sides of the head on the sides.

- Side View: The middle section of the cranium we slice off.

- ¾ View: Depending on the extremity of the angle, the size of the slice of the head depends on the angle. The more the head turns in a certain direction, the bigger the side plane. In a ¾ view, we represent the side place as an ellipse that is ⅔ part of the whole cranium.
- Understanding this concept can be tricky through text alone, so I’ve provided some visual examples below. For a more in-depth explanation and to follow along as I draw, check out the video I’ve made on this topic. You can watch the video [here].

4. Draw in proportions of the face:
Next up is to draw in the proportions of the face, so everything from jaw up. I cannot state enough how important this is. What are proportions anyway? Proportions are the placement, sizing and location of elements within the human body, including the head. Proportions are super important in creating a well developed and ‘normal looking’ head or character.
This is a personal recommendation, but I highly recommend mastering the front view proportions first. This was something I didn’t do and it hurt me in the long run. I focused too much on ¾ view’s and not enough on the basic views. Understand and master the basic front & side view first, and you’re off to the races!
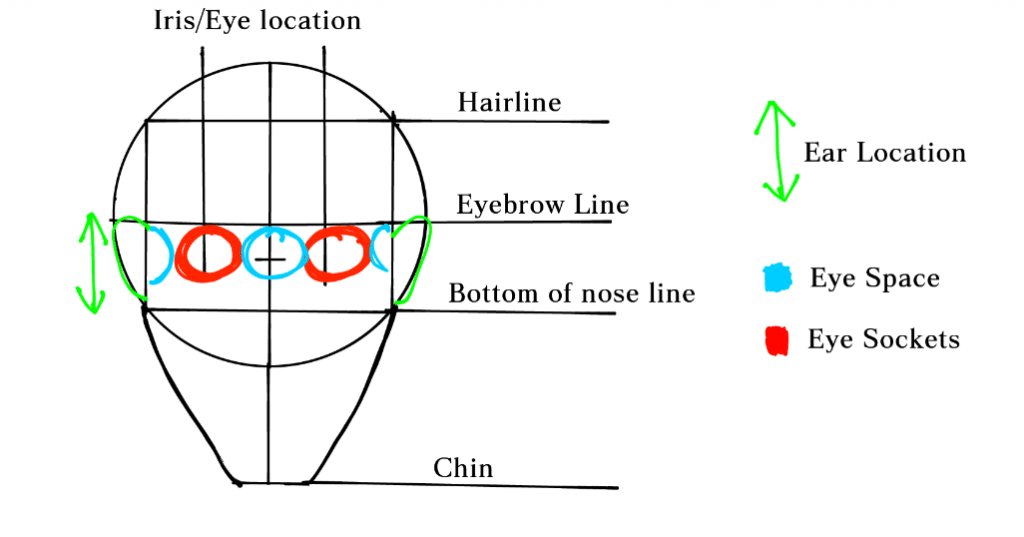
Front View Proportions:
- After drawing in the circle for the cranium, split the cranium in half verically. This = Center line/direction of the head.
- Divide the cranium in half again but this time horizontally. You should have 4 equal quarters now. This = Eyebrow Line.
- Next from the eyebrow line to the top of the head, divide it into 3rds. Then from the Eyebrow line to the bottom of the cranium circle, divide it into 3rds.
- The topmost 3rd = The line/location for the hairline.
- The bottommost 3rd = bottom of the nose.
- From the eyebrow line to the bottom of the circle, we duplicate it down to get the bottom of the chin. This = Chin location.
- From the sides of the head we draw in the Jaw.
- From the bottom of the nose, to the eyebrow line we have the ear location.
- From the bottom of the nose, down to the chin, we divide it into 3rds. The top 3rd = mouth line. The bottom 3rd = top of the chin.
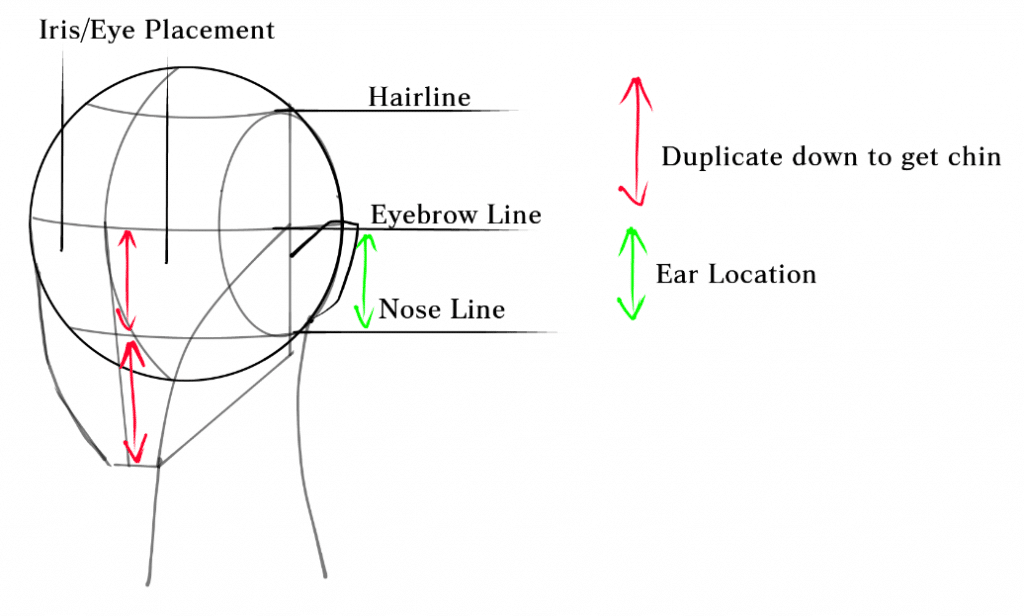
Side View Proportions: (This is something I’m still mastering, so this will be updated in the future)
- From the side view, the head is very ovular so we want to start off with an oval shape.
- Draw a sliced section, but this time it will be circle.
- Then draw a line down from the front of the face. (This would be the center line in the front view)
- Make a plus sign in the circcle we created.
- Then draw a line from the middle of the circle to the front of the face = eyebrow line. From bottom of the circle = nose line, from top of the circle = hairline.
- Then draw in the chin and jaw. Take the distance from nose and eyebrow and this helps find it.
- The ear will be in the bottom quater of the circle.
- Want neck to start from the middle of the jaw,
- Back of the neck from the back of the head.
¾ View Proportions: (This is something I’m still mastering, so this will be updated in the future)
- The proportions of the ¾ views are very similar to the front view.
- The only major difference is the oval on the side.
- If you want the person/character to look up, tilt the eyebrow line up and not straight like below. Same for if you want it to looking down.
Key Consideration for Successfully learning to draw the Loomis head:
The Loomis head is likely the easiest method for a beginner to learn to draw the head. A key consideration to keep in mind is the side oval in both the front and ¾ view. I mentioned it briefly, but in the front view, the side planes appear flat. In my diagram I likely drew it a little too much, make it very subtle in your drawings that there is a side plane on the front.
As for the ¾ view, make sure you spend time to understand and master the side oval for the side plane. The bigger the side plane, the bigger the angle. So for example, if someone has turned almost to the right, the side plane will be a very big oval, meanwhile if it is a small tilt to the right, then the oval on the side is going to be small.
Also KEEP in mind that these are only GENERAL guidelines. Everyone looks different, and in reality there are people from different regions who have different facial proportions. In reality, everyone is different. This will also apply to our characters, use these as foundations and feel free to modify and apply them to your characters.
My Experience with Drawing Heads:
So in conclusion, the Loomis head is a great foundation for drawing the human head. You can apply this to your own characters. I recommend starting off by just memorizing the proportions of the different elements on the face.
I have learnt this a few months ago and I am still practicing it. Even now, I still sometimes have issues with remembering all the proportional elements. Dont feel bad! We’re all on a learning journey together. Just keep in mind the below as extra tasks to do:
- Practice alot – thats the crux of it. Use my resource, as well as others to improve at drawing the head.
- Use reference images, draw over images and apply the loomis method to it.
- Then recreate the reference image on the side.
I will be studying & practicing the loomis method further for this week. I will link a youtube video down below for my progress. If you are interested in following my journey feel free to give it a watch.
Also feel free to check out my other blog posts! Here’s one I have on drawing the facial Features
Thank you for reading and I hope you have a wonderful day!